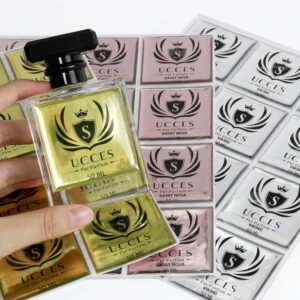
Custom epoxy stickers combine printed artwork with a clear, raised resin coating for a glossy, dimensional finish. You can make them at home by preparing adhesive-backed designs, applying a controlled dome of epoxy, and allowing it to cure fully. Surface tension helps hold the liquid coating within the sticker’s outline—the principle behind that rounded, glass-like appearance.
The best starting point is a small test batch, not a sheet of your favorite finished artwork. Use the process below to plan your materials, organize your workspace, and practice controlling the coating before committing to a larger project.
To make epoxy stickers, print and cut your designs, leave them on their release liner, and arrange them on a level surface. Prepare your epoxy according to its instructions, apply a little resin to each design, and guide it toward the edges without overflowing. Cover the work against dust and follow the product’s full curing schedule before handling or applying the stickers.
Think of this as two connected projects: making a clean sticker base and adding a controlled coating. Practice those stages separately if necessary. A plain circle makes a useful first experiment because you can concentrate on the resin rather than intricate artwork.

Start with an epoxy explicitly intended for doming or coating small decorative surfaces. Check its application instructions rather than assuming every clear resin behaves alike. Your sticker material, printed ink, and any protective sealer also need testing together; resin manufacturers recommend checking suitability when combining resin with unfamiliar materials.
Gather the following before opening either component:
Keep your first supply list simple. Skip decorative inclusions until you have a repeatable process for clear coatings; you can explore more elaborate designs afterward.
Read the safety data sheets for both resin and hardener before starting. Avoid skin contact, wear the specified protective gloves and eye protection, and provide adequate ventilation. Respiratory protection requirements depend on the product and working conditions; follow the manufacturer’s guidance rather than treating an ordinary face covering as a substitute.
Cover the bench, keep food and drinks away, and organize tools within easy reach. Check that your tray is genuinely level: an uneven surface can make resin pool toward one edge or spill beyond the design. Keep the curing area clean and protected from dust and fibers.
If resin reaches your skin, follow the product’s cleanup instructions; do not use solvents to remove it. Wash your hands after finishing, even when you have worn gloves. These precautions belong in every session, not just your first attempt.
Choose a small collection of designs you would enjoy repeating: initials, simple flowers, geometric badges, or short words. Print a trial sheet first and inspect the artwork at its actual size. If a detail already looks crowded on paper, simplify it before adding another material to the process.
Cut the sticker outlines cleanly, keeping the adhesive backing protected. Remove surrounding waste material so each intended dome has a defined boundary, then position the sheet flat on your tray. Check for loose fibers, dust, and moisture before coating.
Porous paper needs particular attention. Doming-resin instructions call for porous surfaces to be sealed and dry before coating, while paper-craft methods emphasize protecting exposed cut edges. Test your chosen sealer on a spare printed design and let it dry completely before adding epoxy.
Label each trial if you are comparing materials. A quick note identifying the paper, ink, and sealer is more useful than trying to remember which combination produced your favorite finish.
Accurate measuring and thorough mixing help prevent sticky patches and uncured resin. Follow your product’s stated ratio and mixing method exactly, including whether quantities are measured by weight or volume. Scrape the cup’s sides and the mixing tool as instructed, and observe any minimum batch size or working-time limits.
Do not borrow a ratio or curing schedule from another brand. Even when two products look similar in their bottles, their instructions are the reference for your batch.
With your designs ready, concentrate on one sticker at a time:
Avoid chasing an exaggerated dome. Overloading a sticker can cause runoff, and a tilted tray can create the same problem even when your application looks reasonable. If several pieces overflow in the same direction, recheck the work surface before continuing.

Stir slowly and deliberately to help limit introduced air, then inspect the coating during the period recommended by your resin manufacturer. Some instructions permit controlled heat for bubble removal, but excessive heat can damage the resin or label. Use only the method approved for your product rather than automatically reaching for a torch.
Treat the first batch as practice. Record whether bubbles appeared during mixing, immediately after application, or later while curing. Those observations give you a better starting point for adjustments than changing every part of the process at once.
Cover the tray without allowing the cover to touch the wet domes. Leave it level and maintain the conditions specified for your resin throughout curing. A surface that feels dry is not necessarily fully cured: manufacturer instructions distinguish between initial handling stages and complete cure.
Once the prescribed cure is complete, examine a test sticker before making more. Look for consistent coverage, a tidy perimeter, and a finish that meets the product’s expected cured condition. Photograph the result beside your notes so you can compare later batches fairly.
Your strongest custom epoxy stickers will come from a repeatable method rather than a complicated design. Keep the artwork manageable, measure carefully, control the pour, and protect the curing work. Once that foundation feels comfortable, experiment with coordinated sets, personalized labels, or more detailed illustrations.
Should I print a full sheet of different designs for my first attempt?
Consider repeating one simple design instead. That makes your trial easier to compare: you can focus on application technique without also judging several shapes and layouts. Save the varied collection for a batch you feel confident repeating.
What should I record in a project notebook?
Note the resin product, sticker stock, sealer, measured quantities, mixing method, and curing conditions. Add observations about the application and finished appearance. Keep a spare printed sample beside the cured version for a useful visual comparison.
How should I handle leftover mixed resin?
Follow the product’s disposal instructions and applicable local requirements. Never pour leftover epoxy down the drain. Plan cleanup before starting so that unused material and contaminated tools are handled deliberately rather than left on the workbench.
Hi! How can we help you today?Tell me the products that need to be made and add WhatsApp.+86 18680366752
Continue to WhatsAppWhatsApp will open so you can send your message.
Choose a contact method or leave a message.
Our team may be busy right now. Please leave your email or WhatsApp number and we will reply as soon as possible.
Fill in the form below to book a 30 min no-obligation consulting session.
I will reply within 24 hours.